

Learn how to strip paint from wood furniture and refinish it like a pro with a Restorer Tool. This complete guide covers preparation, techniques, finishing, and maintenance for stunning DIY results.
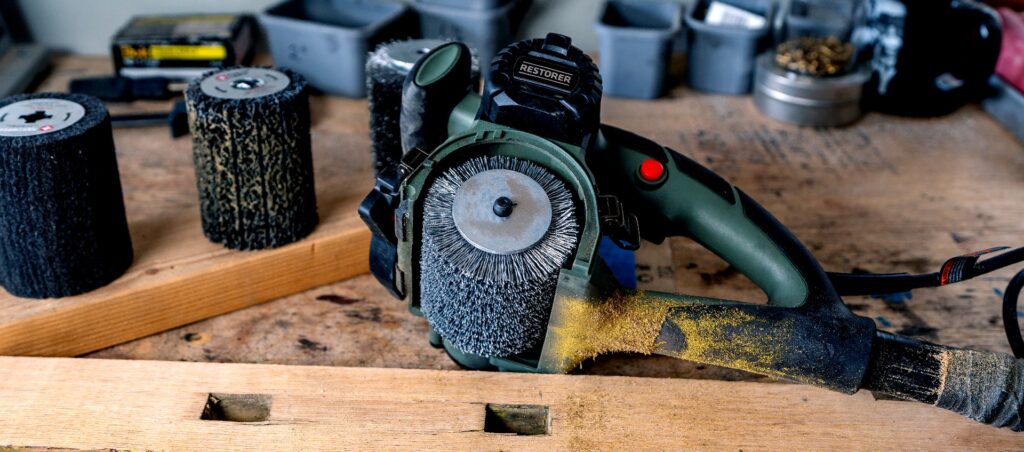
Restorer tool nylon brush
Introduction
Reviving old wood furniture through DIY restoration is one of the most rewarding projects you can undertake. Whether stripping paint from antique pieces or refinishing flea market finds, using a Restorer Tool makes removing layers of paint and grime faster and more efficient than traditional methods like chemical strippers or hand sanding.
While chemical strippers and hand sanding have been traditional methods for paint removal from wood, a Restorer Tool revolutionizes this process, making it faster, more efficient, and more precise for refinishing antique furniture.
In this guide, we’ll cover everything you need to know to professionally restore wood furniture using a Restorer, including:
- Understanding the Restorer Tool – Types, features, and why they’re superior for paint removal
- Comprehensive Preparation – Workspace setup, safety measures, and furniture evaluation
- Step-by-Step Paint Stripping – Detailed techniques for flat surfaces, curves, and intricate details
- Advanced Sanding Methods – Creating the perfect surface for refinishing
- Finishing Like a Pro – Staining, sealing, and protecting your restored furniture
- Maintenance and Care – Keeping your refinished pieces looking beautiful for years
- Troubleshooting Common Issues – Fixing mistakes and overcoming challenges
Table of Contents
| Section | Description |
| 1. Understanding the Restorer Tool | Types, features, and advantages for paint removal |
| 2. Comprehensive Preparation | Workspace, safety, and furniture evaluation |
| 3. Step-by-Step Paint Stripping | Techniques for different surfaces and paint types |
| 4. Advanced Sanding Methods | Grit progression and troubleshooting |
| 5. Professional Finishing Techniques | Choosing and applying finishes |
| 6. Long-Term Maintenance | Cleaning and protection tips |
| 7. Troubleshooting Common Problems | Solutions for common issues |
1. What Is a Restorer Tool? Best Rotary Drum Sanders for Stripping Paint from Wood Furniture
What is the Restorer Tool?
The Restorer is a powerful woodworking and restoration tool that uses a rotating sanding drum to quickly remove material from wood surfaces. Unlike orbital or belt sanders, drum sanders provide more aggressive material removal, making them ideal for stripping multiple layers of paint, varnish, or stain from wood furniture.
Why Choose a Restorer Over Other Methods?
A Restorer Tool excels in paint removal from wood, offering:
- Speed: Can remove paint markedly faster than hand scraping or chemical stripping
- Control: Adjustable speed settings allow for precision work
- Versatility: Can handle both large flat surfaces and contoured edges depending on which sleeve or roller is used
- Cleaner Process: Eliminates the mess and fumes of chemical strippers and can be combined with a vacuum for dust extraction, we recommend this Made in the USA Super Vac
- Cost-Effective: Saves money on disposable supplies like chemical strippers and sandpaper
Types of Drum Sanders for Furniture Work
- Stationary Drum Sanders (Best for large, flat pieces)
Example: Jet 10-20 Plus Drum Sander [affiliate link to best stationary drum sander for large pieces]
Pros: Excellent for tabletops, doors, and panels
Cons: Less portable, higher cost - Handheld Drum Sanders (Most versatile for furniture)
Example: Restorer Tool
Pros: Portable, good for medium-sized pieces
Cons: Requires more user control - Spindle Sanders (For curved surfaces)
Example: WEN 6502
Pros: Excellent for chair legs and rounded edges
Cons: Limited to smaller areas
Essential Accessories
- Sandpaper sleeves (60-120 grit range)
- Dust collection system
- Replacement sleeves and drums
2. How to Prepare for Stripping Paint from Wood Furniture: Workspace and Safety Tips
Workspace Setup
Creating an optimal work environment is crucial for both safety and quality results in paint stripping:
Ideal Location:
- Well-ventilated garage or outdoor space
- Concrete or hard flooring (avoid working on grass)
- Protected from wind to control dust
Essential Equipment:
- Heavy-duty workbench with clamps
- Drop cloths or plastic sheeting
- Proper lighting (LED work lights recommended)
Safety Gear
- NIOSH-approved respirator (N95 minimum) [link to OSHA.gov for safety guidelines]
- Safety goggles with side shields
- Hearing protection
- Heavy-duty work gloves
- Long-sleeve shirt and pants
Furniture Evaluation and Prep
Before starting, conduct a thorough inspection for DIY wood furniture restoration:
Structural Assessment:
- Check for loose joints or cracks
- Look for wood rot or insect damage
- Test stability of legs and supports
Surface Preparation:
- Remove all hardware (hinges, knobs, etc.)
- Clean surface with mineral spirits to remove wax/grease
- Label parts for easy reassembly
- Fill deep gouges with wood filler (if needed)
Paint Layer Analysis:
- Test for lead paint (if pre-1978 furniture)
- Note number of paint layers
- Identify any stubborn coatings (polyurethane, milk paint)
Wondering how to test for lead paint? See our troubleshooting section.
3. Step-by-Step Guide: How to Strip Paint from Wood Furniture Using a Drum Sander
- Initial Setup
Install coarse-grit sanding sleeve (60-80 grit)
Connect dust collection system
Secure furniture piece firmly to work surface
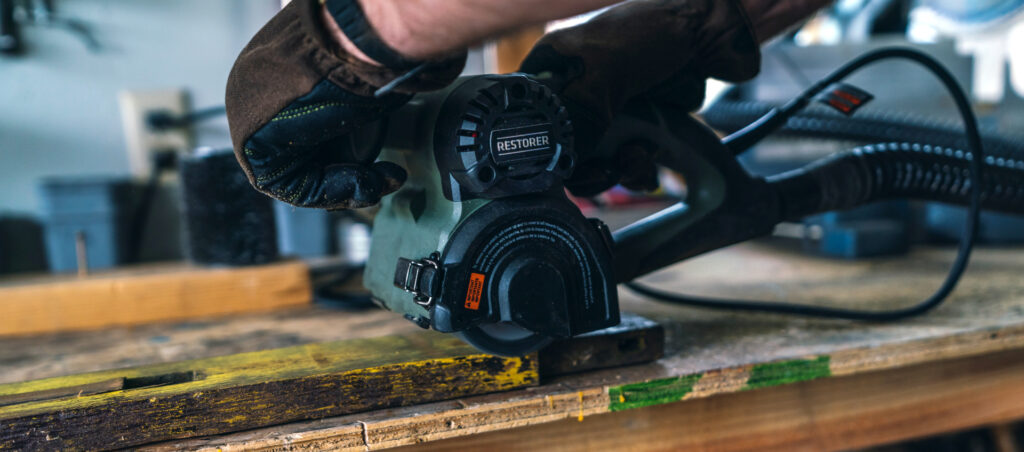
Set tool to medium speed - Stripping Technique for Flat Surfaces
Hold sander flat against surface
Move with the grain in smooth, overlapping passes
Apply even pressure – let the tool do the work
Work in 12″ sections for consistent results
Check progress frequently to avoid over-sanding - Handling Curves and Details
For rounded elements:
Switch to a flap wheel drum attachment, specifically a “profile” flap wheel
Use finer grit drums for better control
Move sander along contours slowly
For tight corners, follow up with hand sanding (removing old paint from wood curves requires patience) - Transitioning to Finer Grits
After removing bulk of paint:
Switch to 120-grit sleeve or 240-grit drum, depending on required finish
Make final passes to remove sanding marks
Hand sand for final smoothing
Special Considerations for Different Paint Types
- Latex Paint: Easiest to remove, starts coming off quickly
- Oil-Based Paint: May require multiple passes
- Chalk Paint: Can gum up sandpaper – clean frequently
- Varnish: Use slower speed to prevent burning
4. Advanced Sanding Tips for Refinishing Wood Furniture After Paint Stripping
Grit Progression Guide
| Grit | Purpose | Technique | Recommended Tools |
| 40-60 | Bulk paint removal | Heavy pressure, slow passes | Restorer with 60-grit sleeve |
| 80-100 | Smoothing surface | Medium pressure, overlapping strokes | Restorer with 80-grit sleeve |
| 120-150 | Final smoothing | Light pressure, with grain | Restorer or hand sanding |
| 180-240 | Prep for finish | Hand sanding recommended | Fine-grit sandpaper |
Troubleshooting Sanding Issues
- Problem: Uneven surface
Solution: Use a sanding block to identify high spots - Problem: Burn marks
Solution: Reduce pressure and increase speed of passes - Problem: Clogged sandpaper
Solution: Use sandpaper cleaner or replace sleeve
Achieving Glass-Smooth Surfaces
- Perform final hand sanding with grain
- Use sanding sealer before final grit
- Wipe with tack cloth before finishing (this is especially important with paint finishing)
5. Best Finishes for Refinished Wood Furniture: Application Guide
Choosing the Right Finish
| Finish Type | Best For | Application Tips | Pros/Cons |
| Oil-Based Poly | High-use furniture | Thin coats, sand between | Pros: Durable; Cons: Longer drying time |
| Water-Based Poly | Quick projects | Dries fast, less ambering | Pros: Fast dry; Cons: Less durable |
| Tung Oil | Natural look | Multiple coats needed | Pros: Natural; Cons: More maintenance |
| Wax | Antique finish | Buff to high shine | Pros: Easy apply; Cons: Less protection |
Application Methods
Brushes:
- Natural bristle for oil-based
- Synthetic for water-based [link to oil-based polyurethane on Amazon]
Spray Finishes:
- HVLP systems for professional results
- Light, even coats
Drying and Curing
- Allow proper drying time between coats
- Maintain dust-free environment
- Full cure can take 2-4 weeks, always check manufacturer’s instructions
6. Maintaining Refinished Wood Furniture: Cleaning and Care Tips
Cleaning Refinished Furniture
- Dust weekly with microfiber
- Use furniture polish sparingly
- Avoid harsh cleaners
Protective Measures
- Use coasters and placemats
- Keep out of direct sunlight
- Reapply wax annually (preventing damage to refinished wood)
7. Common Issues When Stripping and Refinishing Wood Furniture (And How to Fix Them)
- Paint Bleed-Through
Solution: Apply shellac seal coat before finishing - Uneven Stain Absorption
Solution: Use wood conditioner first - Bubbles in Finish
Solution: Sand lightly and reapply thin coat
Conclusion
Using a Restorer for furniture restoration saves countless hours while delivering professional-quality results. By following this comprehensive guide, you’ll be able to master paint stripping and wood refinishing with these pro tips:
- Efficiently strip paint and old finishes
- Prepare surfaces perfectly for refinishing
- Apply beautiful, durable new finishes
- Maintain your restored pieces for years
Remember: Patience and proper technique always yield the best results. Start with a small piece to gain confidence before tackling larger projects.
Ready to begin your furniture restoration journey? Share your before-and-after photos in the comments below! Share this guide on Pinterest for DIY inspiration.
For more DIY guides, subscribe to our newsletter.
Related Articles: [How to Choose the Best Sander for Wood Projects](internal link)
FAQ
What is the best tool for stripping paint from wood furniture?
A Restorer tool is ideal for efficiency and control in paint removal from wood.
How long does it take to refinish wood furniture?
Typically 2-5 days, depending on size and drying times.
Can I strip paint without chemicals?
Yes, using a drum sander like the Restorer avoids chemicals entirely.
What grit should I start with for paint stripping?
Begin with 40-60 grit for bulk removal, then progress to finer grits.
How do I prevent uneven sanding?
Secure the piece firmly and use even pressure while moving with the grain.
Is a Restorer tool good for beginners?
Yes, with practice on small projects, it’s user-friendly for DIY wood furniture restoration.
What finish is best for kitchen tables?
Oil-based poly for high durability on high-use surfaces.
How to test for lead paint?
Use a lead test kit available at hardware stores; essential for pre-1978 furniture.
Can I use a Restorer on veneered wood?
Yes, but with caution—use lighter pressure to avoid damaging thin veneer.
Why does my finish bubble?
Often due to thick coats; apply thin layers and sand between.